Quick Start (Simple First Spread)
If you want the setup in 60 seconds before reading the rest of this page — here it is.
The 60-second version
- Start with 4 inline boards and 4 rods — one board per rod, two per side. Each line gets its own board. Add more rods once the first spread runs clean.
- Get to trolling speed first (1.8–2.0 mph GPS) before setting any lines.
- Inside lines first — shorter leads (50 ft), closest to the boat.
- Outside lines second — longer leads (75–90 ft), board walks out to the side.
- Stagger every lead by at least 20 ft — same-length leads cross on every turn.
- Keep turns wide and gradual — tight turns tangle, every time.
- When a board fires — slow the boat, straighten course, then fight the fish.
Change ladder: what to adjust when bites stop
1. Speed — 0.2 mph up or down, full pass. 2. Lead length — shorten or lengthen by 25 ft. 3. Bait style — swap action profile. 4. Color — last resort only.
What Planer Boards Actually Do
Boards solve three problems that limit how many fish you contact when trolling without them.
They Spread Your Lines
Without boards, all your lines trail directly behind the boat in a narrow corridor. With two boards out, you cover 20–30 extra feet per side — a 50+ foot wider swath of water on every pass. That means more water covered per hour and a dramatically higher chance of crossing over holding fish.
They Reduce Spooking
Walleye — especially in clear water — spook from boat noise, shadow, and prop wash. Boards move baits well away from the hull into undisturbed water. On fisheries where fish are heavily pressured or the water is gin-clear, this difference alone justifies running boards.
They Cover Multiple Depth Zones Simultaneously
Longer lead lengths on outside board rods push crankbaits deeper than inside rods at the same speed. Running different leads per rod lets you cover shallow, mid, and deep simultaneously in one pass — instead of making separate passes for each depth zone.
When You Don't Need Boards
- Tight river channels or backwaters where spread width isn't useful
- Vertical jigging or bottom bouncing presentations
- Very heavy current where boards won't plane properly
- When you're learning trolling basics — flat-line first to master speed and depth control, then add boards
Parts You Need
A board spread has five components. Each one does a specific job and each is required.
1. Planer Boards
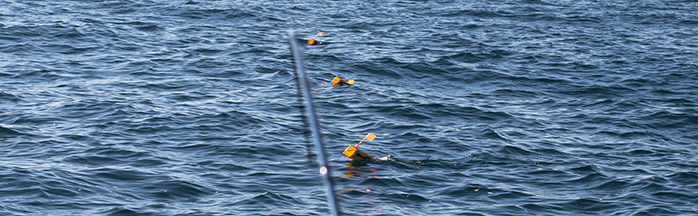
The board planes across the water surface when line tension holds it at angle, walking out to the side as you troll forward. Two main types:
- Inline boards (side planers) — clip directly to your fishing line. The board rides the line out to the side and either trips free or slides down the line when a fish fires, depending on release setup. Simpler to rig, no mast needed. Best starting point for most anglers.
- Mast systems — a board rides a separate mast line running from the boat, and individual release clips hold fishing lines at intervals along that mast line. More complex and hardware-intensive, but scales to more rods and provides more consistent positioning in rough water.
Start with inline boards. They require less setup, are forgiving of mistakes while you learn, and are effective on virtually all inland and Great Lakes walleye fisheries.
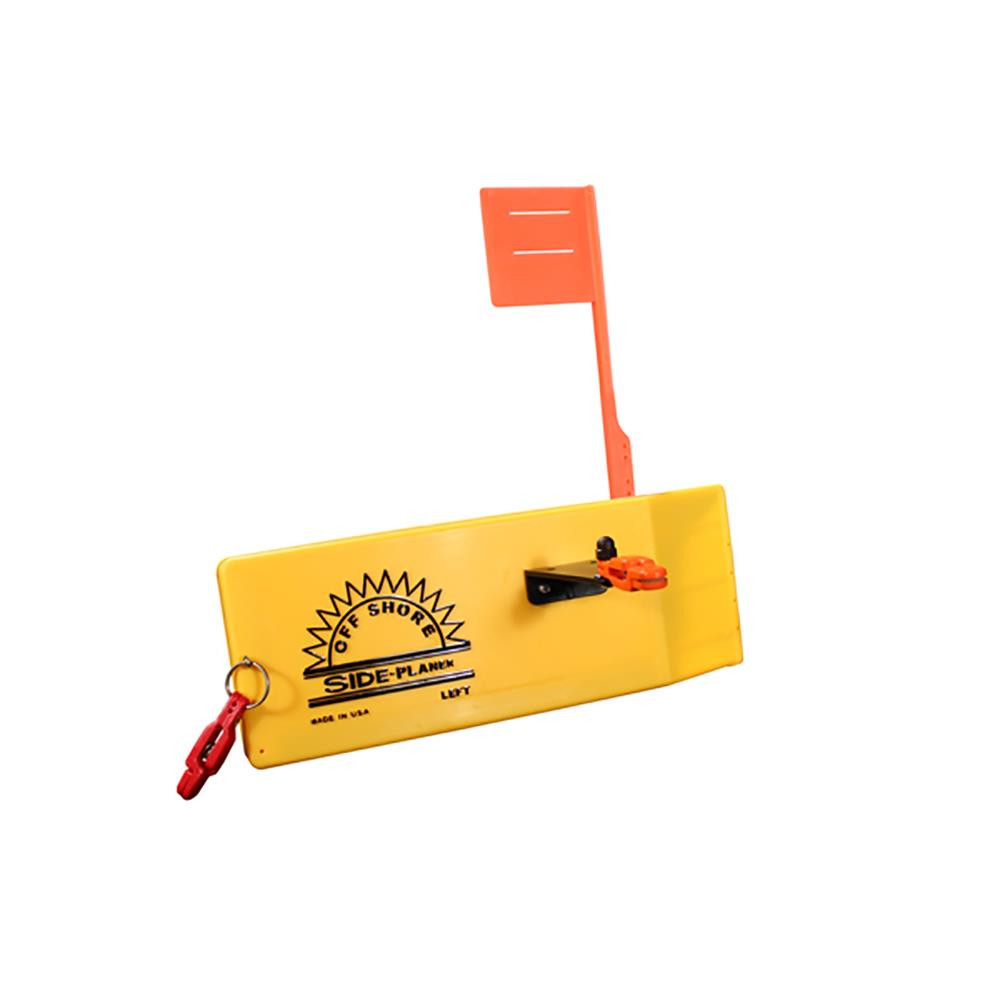
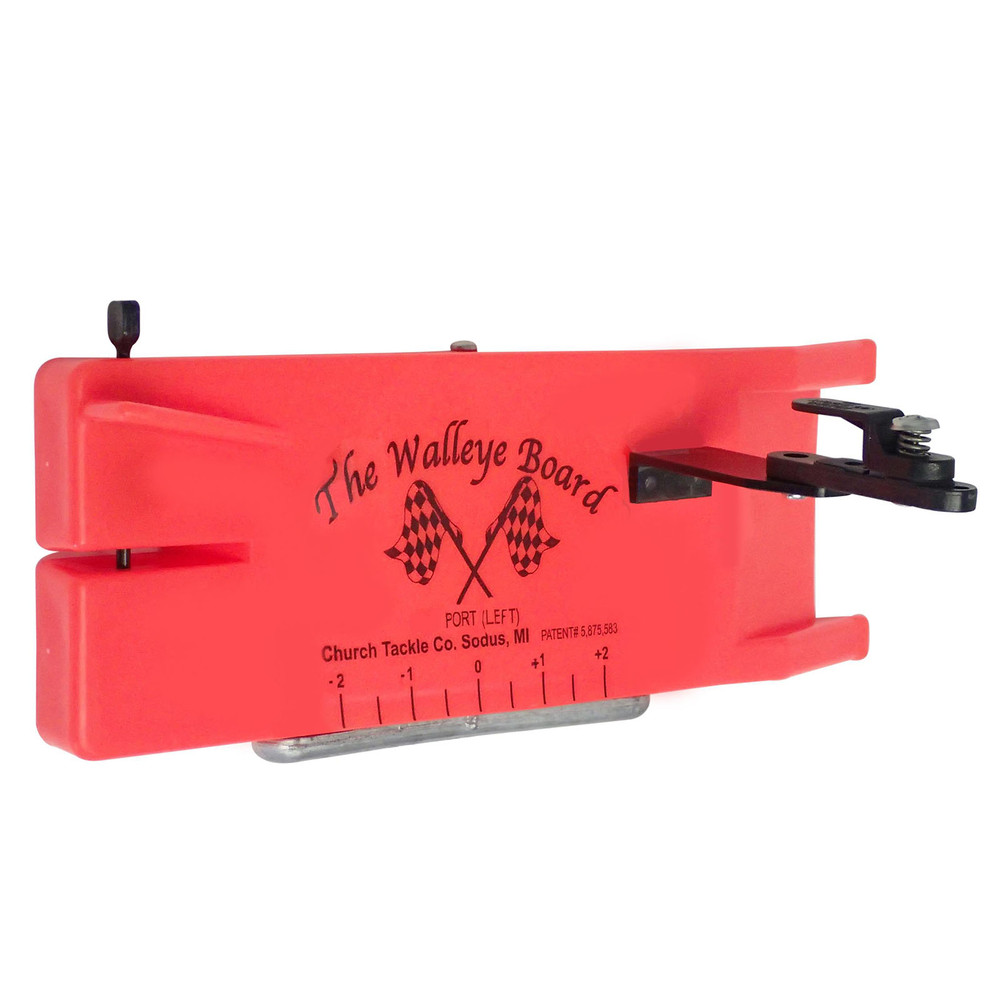
OR12 or Church Tackle: Choose Your Board
Start with the OR12 for budget builds — upgrade to the Church Tackle board for rough-water or tournament use
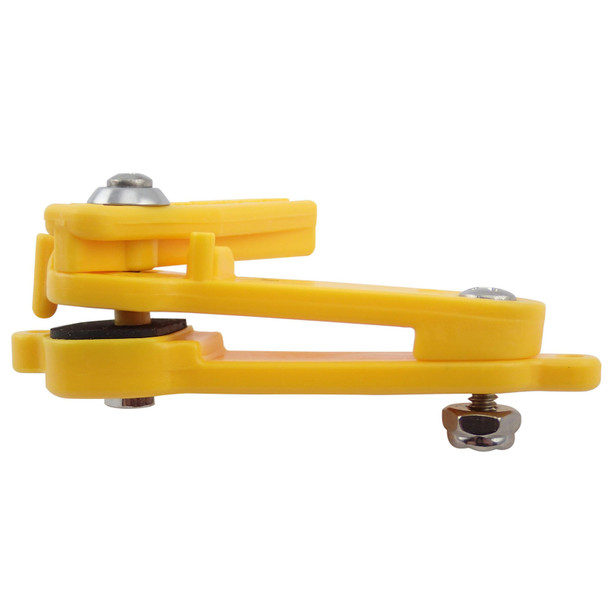
2. Releases
The release clips your fishing line to the board. It holds the line securely while trolling and trips free — or slides down the line — when a fish strikes. Two things matter most:
- Tension is adjustable on most releases. Too light and the board trips on every wave; too heavy and fish come off before the rod fires. Test before fishing each day.
- Tattle-flag releases provide a visible indicator when a fish fires — useful in choppy conditions or when watching multiple rods at longer leads.
3. Line, Rods + Reels
10 lb monofilament is the standard starting line for walleye crankbait trolling. It has consistent, predictable depth performance and enough stretch to cushion strikes on light treble hooks. Switching to fluorocarbon or superline changes how deep your cranks run at the same lead length.
A linecounter reel is not required to start but makes the spread dramatically more repeatable. When one lead length produces bites, a linecounter lets you duplicate it exactly on every rod in seconds. Add them as soon as the budget allows — they're the highest-return upgrade in a trolling setup.
Rods in the 8–9 foot range with medium-light to medium power keep lines elevated above the water and give a longer sweep for fighting fish at the board.
4. Crankbait Snaps + Swivels
A crankbait snap at the end of your line lets you change baits in 10 seconds without re-tying. A ball-bearing swivel above the snap prevents line twist on long trolling runs. Both are required components — skip them and you'll be re-tying on the water or dealing with twisted line within the first hour.
5. Crankbaits
Cover three depth zones: shallow (3–8 ft), mid (8–14 ft), and deep (14–20+ ft). Run one bait per depth zone. The goal is to find where fish are holding — not to run a dozen colors at one depth. Once you locate the active zone, then refine color and action.
Setup Steps: 4-Rod First Spread
Follow this order every time. Lines set in the wrong sequence are the most common cause of first-trip tangles.
Step 1 — Reach Trolling Speed First
Get to your target GPS speed (1.8–2.0 mph) and hold it steady before dropping any lines. Lines set while accelerating run at inconsistent depths and tangle more easily. Don't touch the rods until the boat is stable at speed.
Step 2 — Set Rod 1: Inside Left
Let out 50 feet of line (note it on your linecounter or count your pulls). Clip the line into the release. Send the board out to the left — it will plane across the surface as line tension holds it at angle. Set the reel clicker on. This is your shortest inside lead.
Step 3 — Set Rod 2: Inside Right
Mirror Rod 1 on the right side — same 50 ft lead, same process. Confirm both boards are planing cleanly before proceeding. If either board is riding low or diving, stop and troubleshoot before setting more lines.
Step 4 — Set Rod 3: Outside Left
Let out 80–90 feet — more than the inside rod. Attach the release and send the board further out to the left. The longer lead is what prevents this line from crossing the inside rod on turns.
Step 5 — Set Rod 4: Outside Right
Mirror Rod 3 at the same 80–90 ft lead. You now have four lines out — two inside at 50 ft, two outside at 80–90 ft. Note all four linecounter readings.
Step 6 — Confirm All Boards Are Planing
Look at each board before making any course adjustments. Every board should be running at roughly 45 degrees off the stern, planing cleanly on the surface. A board riding too low or dragging will collapse into other lines without warning. Fix any board issue before turning.
Example first spread
Rod 1 — Inside Left: 50 ft · shallow crankbait (runs 3–8 ft)
Rod 2 — Inside Right: 50 ft · mid crankbait (runs 8–14 ft)
Rod 3 — Outside Left: 85 ft · deep crankbait (runs 14–20 ft)
Rod 4 — Outside Right: 85 ft · shallow crankbait (runs 6–10 ft — same bait as Rod 1, runs deeper on the longer lead)
This covers four distinct depth windows across the spread. The 35 ft lead gap between inside and outside rods keeps the lines from crossing on turns.
Spacing + Staggering (Why It Prevents Tangles)
Staggered leads are the single most important habit in a clean board spread. On a turn, the inside board slows relative to the outside board. If two rods run the same lead length, they converge at the same point and cross. Staggered leads keep lines at different positions so they never intersect.
| Rod Position | Lead Length | Why |
|---|---|---|
| Inside board | 40–60 ft | Shallower, easier to manage, less tangle risk on turns |
| Outside board | 75–100 ft | Deeper, stays outside the inside line arc on turns |
| 3+ rods per side | 20+ ft stagger per rod | Each additional rod needs at least 20 ft separation |
Board Spacing on the Water
- Inside boards: roughly 15–25 feet from the boat on each side — inline boards plane out naturally at speed, so let them find their angle.
- Outside boards: 30–40 feet from the boat — far enough to keep baits out of disturbed water and provide a clean separation from inside rods.
- On inline boards, the board walks out as far as line tension and speed allow. Confirm boards are well-separated before making turns.
Linecounters make stagger repeatable
Without a linecounter, lead lengths drift over time — a "50 ft" rod gets set at 45 ft, the gap shrinks, and tangle risk increases. A linecounter makes every lead exact, every time. Add them to your setup as soon as the budget allows.
Turns + Boat Control
Turns are where most new trollers tangle. The physics change on every board the moment the boat changes direction.
What Happens on a Turn
- Inside board (turning toward it): slows down, loses planing angle, and begins to sink or drift toward the boat. The line goes slack and the bait drops. A sharp turn causes the inside board to collapse into other lines.
- Outside board (turning away from it): speeds up, plane angle increases, and the bait speeds up and dives slightly.
- Lines behind the boat converge during a turn as the boat arcs. The tighter the turn, the more they converge.
Turn Rules
- Always turn wide and slow. A gradual arc of 50–100 yards is the target. The wider the turn, the less lines converge.
- Bring inside boards in before tight turns. Any turn tighter than a wide arc requires the inside boards to come in first. Outside boards can usually hold through a gradual turn.
- Maintain speed through turns. Slowing down causes all lines to sink simultaneously — they can snag bottom, tangle with each other, or both.
- After the turn, confirm all boards before making bait changes or adding rods.
When a Board Fires on a Turn
Complete the turn first. Attempting to fight a fish mid-turn while managing boards is a reliable way to lose both the fish and tangle the spread. Straighten the boat, slow down, then address the fired board. Have a second person manage other boards while you fight if possible.
Common Mistakes
Not Staggering Leads
Running all rods at the same lead length is the most common first-trip mistake. Two rods at 75 ft will cross on every turn. Stagger every rod by at least 20 ft. Inside shorter, outside longer — every time.
Making Tight Turns
A U-turn at trolling speed with 4+ lines out is guaranteed to tangle. Plan turns well in advance. If you need to reverse direction, make a wide S-curve or bring boards in first. There is no shortcut to a clean tight turn with a full spread out.
Running Too Many Lines Too Soon
Starting with 6 rods when you've never run boards before is a reliable way to spend the day untangling. Start with 2 boards and 4 lines. Get that spread running clean for a full trip before adding rods.
Fighting a Fish Without Managing Other Boards
When a board fires, instinct is to grab the rod. But if you fight the fish while the boat keeps moving, the other boards and lines will tangle around the fish. Slow the boat first. Bring in the fired board or let it slide down the line. Then fight the fish.
Setting Lines Before Reaching Trolling Speed
Lines set while the boat is accelerating run at the wrong depth, tangle more easily, and give you a false read on where baits are running. Always reach target GPS speed and hold it steady before dropping any lines.
Troubleshooting (Fast Fixes)
I keep tangling
- Are all leads staggered by at least 20 ft? Same-length leads cross on every turn.
- Are turns wide enough? Tighten the arc even more and see if it stops.
- Are inside boards coming in before tight turns?
- Are all boards planing correctly? A board riding low will drift into other lines.
- Reduce to 2 boards and 2 lines until the spread runs clean, then add rods one at a time.
Boards keep diving or popping off
- Diving board: check trim setting and confirm debris isn't on the balance point. Increase speed slightly.
- Board popping off line: increase release tension. In chop, boards need more tension to hold against wave impact.
- Board at wrong angle: confirm the board is rigged direction-correctly — inline boards are not reversible.
- Board flopping in wind: increase speed or upgrade to a heavier-duty board rated for rough conditions.
No bites
- Speed first: bump 0.2 mph and make a full pass. Try slower if faster doesn't produce. See Trolling Speed Control.
- Lead length second: lengthen all rods 25 ft to change depth. See Lead Length Rules.
- Confirm depth on sonar before changing anything — if fish are at 22 ft and your baits are at 10 ft, no color change will help.
- Bait style third: wide wobble vs. tight action. Color last.
Gear for Your First Board Spread
Shop the categories below. Start with the three required items — you can add the rest once the basics are running clean.
Buy this first (minimum viable spread)
- 1. Planer boards (1 pair) — inline side planers for both sides of the boat.
- 2. Snap releases — releases that match your board type. Buy extras; they wear out.
- 3. Crankbait snaps + ball-bearing swivels — fast bait changes and twist prevention. Both required.
Off Shore Tackle OR12 + Running Hardware
The boards, releases, snaps, and swivels that complete the spread


Ready for the complete gear builder?
The Walleye Trolling Starter Spread page includes a full bundle builder with boards, releases, crankbaits, linecounter reels, and terminal — pre-configured by kit tier. One page, everything you need.
Read Next
Planer Boards FAQ
You don't strictly need them, but boards are one of the highest-impact tools in any walleye spread. They spread lines 20–30 feet per side, keep baits out of the boat wake, and let you cover far more water than flat-lining. On clear water or open-water fisheries, boards make a significant difference in fish contact per trip.
50 feet is the standard baseline lead. Inside board rods run shorter leads (40–60 ft) and outside board rods run longer leads (75–100 ft). The lead length stagger is what keeps lines from crossing on turns. Adjust from 50 ft based on the depth zone you're targeting and how fish are responding. See Lead Length Rules for the full breakdown.
Four habits prevent the vast majority of tangles: stagger your lead lengths (inside rods shorter, outside rods longer), make wide and gradual turns, set inside lines before outside lines, and bring inside boards in before any tight turn. Start with 2 boards and 4 lines. Get that spread running clean for a full trip before adding more rods.
Inline boards (side planers that clip directly to your line) are the better starting point. Simpler to rig, no mast or reel system needed, and very forgiving while you're learning. Once you're comfortable with a 4–6 rod spread and want more consistent separation or to run more rods efficiently, a mast system scales up better. Start inline, upgrade when the system feels limiting.
1.5–2.5 mph measured by GPS over ground covers most walleye trolling situations. Start at 1.8–2.0 mph. Speed is the first variable to change when bites slow — adjust in 0.2 mph increments and make a full pass before evaluating. Always use GPS speed, not throttle feel or engine RPM. See Trolling Speed Control.
Add divers once you're comfortable keeping your board spread clean and you need more depth than long leads on standard mono can reach — typically when walleye are holding at 25–35+ feet. Master the board spread first. More on when to add divers →
Start every rod at 50 ft and note what depth zone each bait reaches on your sonar. Inside rods at 40–60 ft, outside rods at 75–100 ft. Once one lead produces a bite, duplicate it exactly on matching rods using a linecounter reel. See Lead Length Rules for depth charts.
Increase speed slightly to maintain board planing angle against wind resistance. Increase release tension so boards don't trip on wave impact. Troll into or across wind where possible — running directly downwind makes boards unstable. In heavy chop, reduce to 2–3 lines until conditions improve. Heavier-duty boards handle rough water better than standard inline boards.
Start with 4 lines — 2 inside board rods and 2 outside board rods. This is manageable for one or two people and covers two depth zones. Add a 5th and 6th rod once you're comfortable with stagger, turns, and fighting fish while managing the spread. More than 6 lines significantly increases tangle risk until you're very experienced.
Set tension so you have to pull firmly but not forcefully to trip the release by hand. Too light and boards trip on every wave; too heavy and walleye come off before the rod fires. Heavier line needs more tension to hold cleanly. Test each release before setting lines and re-check periodically through the day.